
Wednesday, 22 June 2011
Mum's Star blanket
I started the star blanket for mum today because I don't have the right amount of yarn for the rapunzel scarf. I'll get more tomorrow and start it then but I thought I would share a picture of mum's blanket so far because the colour are lovely and bright :)
![]() Colours are brighter in real life than in the picture, I hope she likes it :)
Colours are brighter in real life than in the picture, I hope she likes it :)
Tuesday, 21 June 2011
Finished Star Blanket
As you can see in my last blog post I had started making a star blanket from issue 16 of Inside crochet... well now it's finished YEY! It was really easy to make and relatively quick to make too! It's the first pattern I've made from inside crochet and it has turned out really well. So with out further ado here are some photos.

I love the star pattern in it .. kind of reminds me of flowers

And to cuten my blog post here are some dog photos...
This is Holly and she LOVES being wrapped in clothes or blankets so she is very obliging

Katie however isn't so obliging but I managed to snap a picture of her wrapped in it :)
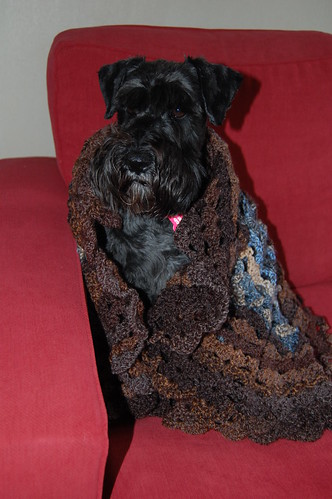
Awwh she always looks so serious but shes lovely :D
And finally here is a couple of pictures of it on the settee
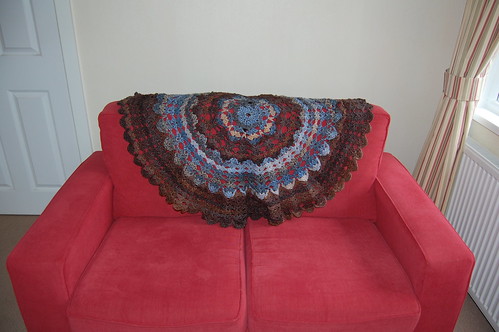
Its the biggest thing I have ever made! and is so different from making Amigurumis

So my Mum loves it and wants me to make one for her, so we went back to the yarn shop and got more yarn in different colours. I should point out that the pattern says you need two 200g balls of each colour but I only used 200g of the blue (sandpiper) colour... so these are the colours Mum chose from the colours available (though there weren't that many as they are so popular that they were selling fast)

I also found another yarn shop just down the road from the other yarn and it had Noro silk garden yarn that I wanted so I could make the Rapunzel scarf in the same issue... I love the colours!

Can't wait to start both projects but I also need to finish the Buttered toast scarf. If only there were more hours in the day!
Friday, 17 June 2011
Update: crochet madness
I'm absolutely loving the summer holiday... can't believe that I won't be back in uni until October and that's only if I choose to do a masters! Anyway I have been crocheting two bigger projects than I usually do. So to start I've started doing Twinkie Chan's Toast scarf. I've done three slices so far and I can't wait until I have finished it (just another 13 slices to go!). I used yarn I got from a yarn shop at home but they didn't have any brands I've heard of. Wish I could find somewhere that sold Lion brand yarn in the UK because I don't fancy ordering it from the USA. Anyway here are some pictures of my finished three slices!

mmm plated and ready to serve!

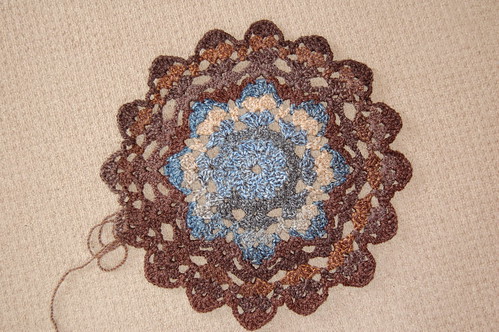
Ok so my next project which I started yesterday. I had brought along with me issue 16 of inside crochet, it has a lovely blanket in it (star blanket) made in James C. Brett yarn. I figured I would never be able to find this specific yarn but went in search of other bulky yarn. My Dad found a yarn shop in Ruthin and off we went! It was only a small store but it had a nice selection. She told me the bulky yarn was on the bottom three shelves so I bent down and to my disbelief there it was! James C. Brett yarn! However they only had one ball of the aqua yarn. So I chose my own colour combination which has produced an much subtle contrast but I love it! Here are two picture of the first two bands of colour....
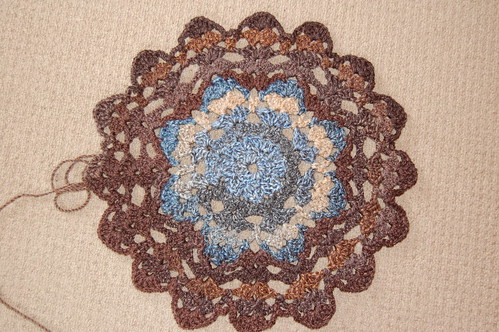
I love the pattern and so far it has been an absolute joy to crochet! I feel like going back to the Ruthin yarn shop and buying a different combination of colours and crocheting another straight after!
Another project I'm intermittently doing is the scandinavian throw, which I have now finished all 15 small blocks and am half way through making the first of the four big blocks :D
Anyway I'm off to crochet some more but will keep you updated!
Monday, 13 June 2011
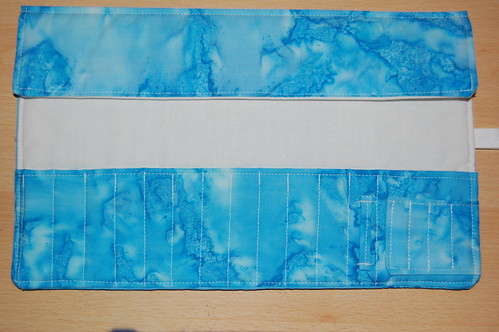
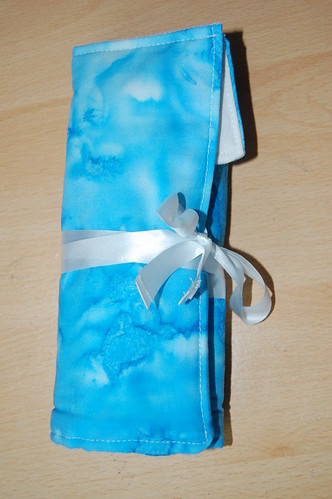
Crochet hook case :D
I ordered a set of 12 crochet hooks as my set is rather random and incomplete. So with my 12 new hooks on the way (2mm- 8mm) I decided to make a crochet hook case. I found THIS great tutorial by Joanne for the perfect crochet hook case and I am thrilled with the results! I used fabric from what remained of my mums stash (from the days when she did quilting) to save money. I also made a few adjustments to the pattern:
- Made it 3 inches longer to make it large enough for all 12 hooks
- Decreased the size of the inside pocket so it was an inch shorter (accidental)
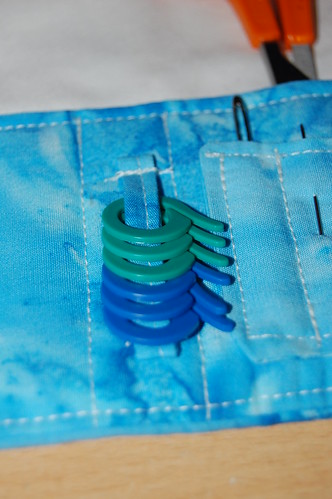
- Added a little bar to hook on my stitch markers
- Made the top flap an inch bigger (to compensate for accident)
- Used wadding instead of interfacing (because I had no interfacing)
The instructions were really easy to follow and the case has a nice finish. I can't believe that after rolling out of bed past 11 that I managed to finish it by 5.30 when the last time I sewed I was about 13. My mum was a great help she guided me through the first half making sure I was doing it correct and then I felt confident enough to finish it when she went away.
Here is a picture of my current case and hooks and as you can see I have a random assortment of hooks. I got the case free with a magazine (can't remember which magazine though). It has no room in it for my new hooks.


Here is a picture of my current case and hooks and as you can see I have a random assortment of hooks. I got the case free with a magazine (can't remember which magazine though). It has no room in it for my new hooks.
Here is a picture of the new case without the hooks...

Here is a close up of the stitch marker holder with stitch markers on. I love this little addition, it means I will be able to carry them with me without worrying that I will loose them!
I love the fabric I used, I'm so glad I did use it despite not particularly wanting to.
And finally here it is with my 12 new hooks which arrived today :D
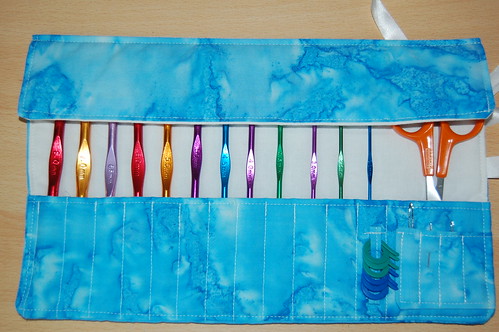
I am dead chuffed with it and definitely recommend using this tutorial/pattern if you choose to make one!
Hope you like it x
P.s check out Easy makes me happy blog, she has brilliant designs and is currently doing a giveaway of her awesome lamb bonnet hat!
Sunday, 5 June 2011
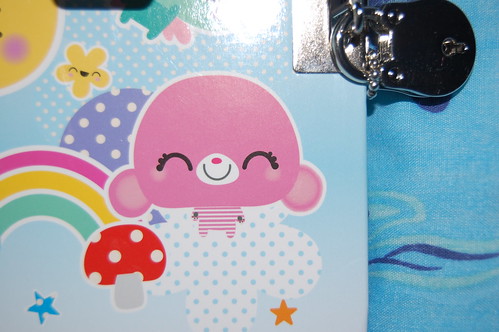
Kawaii paperweight
I recently bought a notebook and some magnets from a shop called Paperchase. I've never seen this shop in the northwest, but I saw it in London and Portsmouth. I think the creatures on them are really cute. So I decided to make one of them myself. I went for the pink one to start with. As you can see on the book....
And the magnets....

I'm still learning the ropes, in terms of when creating my own shapes, knowing when to increase and decrease (bar doing a sphere which I've made enough to know how to do it). But practice makes perfect so here is may attempt at the head...
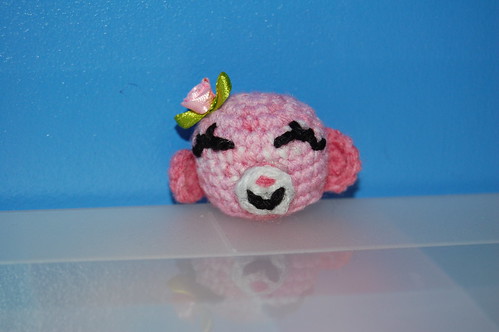
The head is quite small, which is how I wanted it but maybe the features could have be smaller. I added a flower to the head like in the magnet picture. I'm really pleased with it and it makes a good paper weight. I did write down the pattern for it but I think I might make tweeks before I ever post it.

Hope you like it!
Friday, 3 June 2011
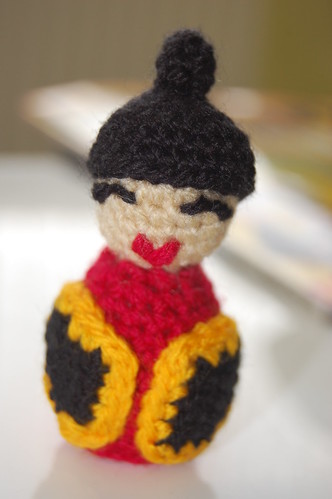
My First Pattern: Happy Geisha
So I've finally got around to making my own pattern. The other day I saw a geisha doll and decided to crochet one myself. Here is a picture of it...
and a picture of the back which has a flower on it...

So here is the pattern, I would love it if you would like to make one and give me feedback on what you think of the pattern, and if it has any hiccups.
The pattern will be written in US terms. In the abbreviations I will put the UK name for the stitch in brackets.
Abbreviations
Ss = Slip stitch
Ch = Chain stitch
Sc = Single crochet (Double crochet)
hdc= Half double crochet (Half treble crochet)
dc= double crochet (treble crochet)
Inc = Increase (two sc in one sc)
Dec = Decrease (crochet two stitches together)
* = repeat
Hooks used 3.5 and 2.5
Body 3.5mm hook, red yarn
and a picture of the back which has a flower on it...
So here is the pattern, I would love it if you would like to make one and give me feedback on what you think of the pattern, and if it has any hiccups.
The pattern will be written in US terms. In the abbreviations I will put the UK name for the stitch in brackets.
Abbreviations
Ss = Slip stitch
Ch = Chain stitch
Sc = Single crochet (Double crochet)
hdc= Half double crochet (Half treble crochet)
dc= double crochet (treble crochet)
Inc = Increase (two sc in one sc)
Dec = Decrease (crochet two stitches together)
* = repeat
Hooks used 3.5 and 2.5
Body 3.5mm hook, red yarn
- Magic circle
- 6 sc in ring
- *2 sc in each sc* around
- *1sc, inc* around
- sc in each stitch (backloops only)
- sc around
- sc around
- sc around
- sc around
- sc around
- *2sc, dec* around
- sc around
- *1sc, dec* around, sc
- Place coin in base as a weight and stuff
- *sc, dec* around, sc
- Fasten off and stitch top closed
Flower for back 2.5mm, Golden yarn
- magic ring
- 5sc in ring
- inc around
- *(hdc, dc, ch1, dc, hdc in one stitch), ss in next stitch* repeat 5 times
- Fasten off
Sleeves (make 2) 2.5mm black yarn
- Ch2
- 2sc in 2nd ch from hook, ch1 and turn
- inc in each stitch, ch1 and turn
- 3sc, inc, ch1 and turn
- inc, 2sc, dec, ch1 and turn
- sc across
- fasten off
- join in golden yarn
- sc around edge of sleeve (all the way around)
Head 2.5mm, skin coloured yarn
- magic circle
- 6sc in ring
- inc around
- *sc, inc* around
- *2sc, inc* around
- sc around
- sc around
- sc around
- *2sc, dec* around
- *sc, dec* around
- dec around
- fasten off
Hair 2.5mm, black yarn
- magic circle
- inc in each stitch
- *1sc, inc* around
- *2sc, inc* around
- sc around
- sc around
- fasten off
Bun 2.5mm, black yarn
- magic circle
- 6sc in ring
- sc in each stitch
- sc in each stitch
Finishing off
Embroider face
Attach bun to hair and then attach hair to head
Attach flower to back of body
Attach the sleeves to body
Wednesday, 1 June 2011
Holiday crochet
I have currently been visiting my brothers in the south of the country, so I have been very busy. Considering that I had to catch the train here I couldn't bring much crochet with me (mind you I haven't had much time to crochet). However I brought some yarn with me to make some coasters in the evening before bed. I found a lovely pattern on Ravelry, which is simple and quick (you may have noticed that I don't like big projects). Here are some pictures below:
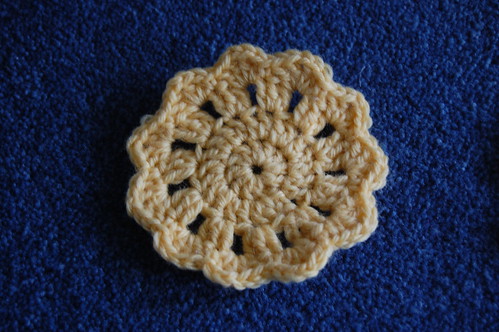
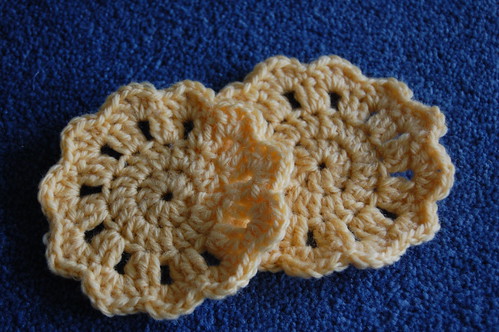
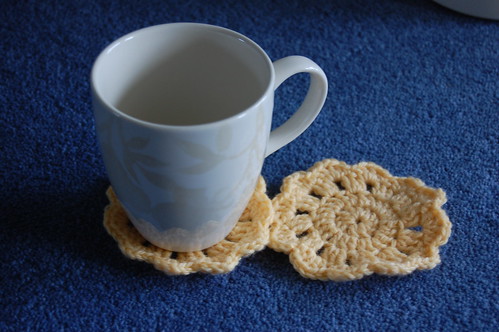
I definitely prefer making Amigurumi but this has been great to do whilst on holiday
Subscribe to:
Posts (Atom)